A Reminder Why Multi-Step Forms Can Increase Conversions
26th January 2021
About GIF
6th February 2021Unity 3D is a game-making engine that is powerful, simple to use, and most importantly, free to download! (There is a more powerful paid version, but you can do a lot with the free version.)
Despite its name, Unity can be used for both 2D and 3D games. You can do programming in C#, Java, or Boo, a language similar to Python. In this tutorial, I will walk you through the Unity environment and show you how to make a simple game in Unity.
You do not need any coding experience to follow this Instructable; however, it is recommended because you may have an easier time proofing your code for errors if you have some background some kind of coding language.
This Instructable is based on the RollaBall tutorial on the Unity website. There are a large number of free tutorials that can be found on the Unity tutorial webpage. I created this Instructable mostly for my own practice with Unity, but also to supplement the video tutorials with a set of step-by-step written instructions.
Step 1: Create a New Project
Open Unity3D
Close the “Welcome to Unity” window that pops up by default when you open Unity.
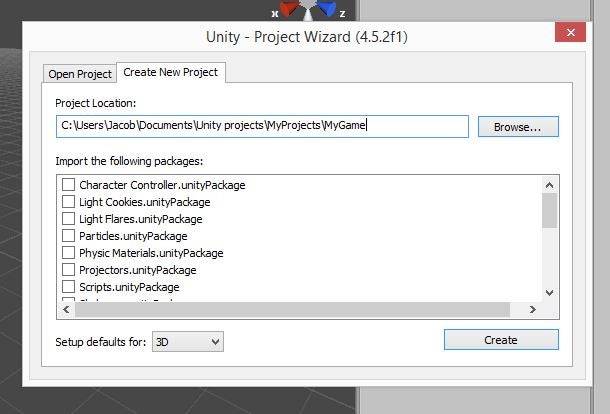
Click File – New Project
Select the location for your project. I like to use one dedicated folder to hold all my Unity projects.
Type the name for your project. In the screenshot, the new project is called “
See the screenshot for how this should look before clicking the Create button.
Click “Create.”
Step 2: Customize the Layout
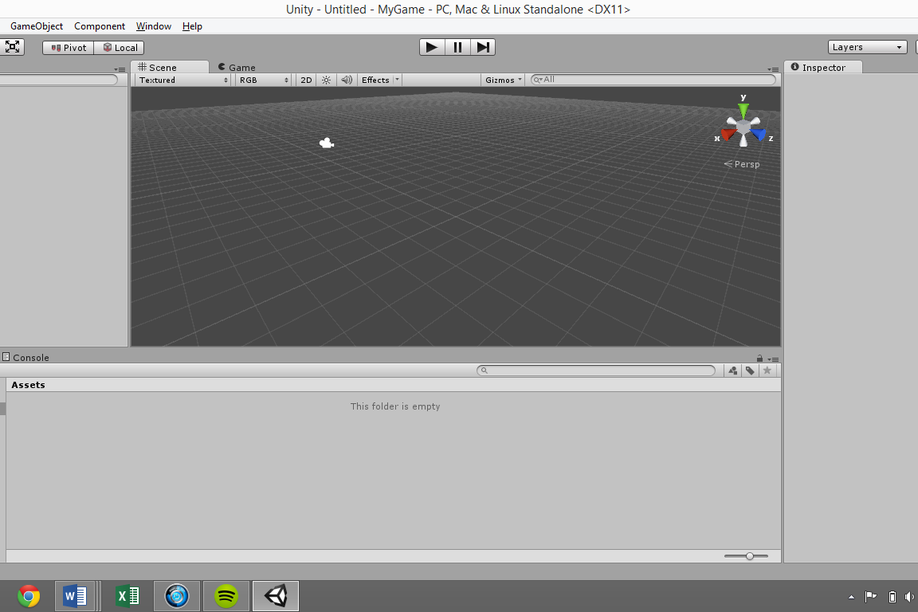
The first thing you may want to do is customize the layout. Every window can be clicked and dragged into position. Alternatively, you can use the default layouts provided with Unity by clicking the drop bar under Layout in the top left of the screen. I like the Tall layout, though I find it helpful to put the Game view below the Scene view.
There are five main windows that you are using most of the time with Unity. They are the Scene, Game, Hierarchy, Project, and Inspector windows. See the five pictures at the top of the step for images of each window.
Scene – this is where the game making happens. It shows what elements you have in your game and where they are relative to each other. There is a block in the upper right corner showing the spatial orientation of the scene.
Game – shows the view that the main camera sees when the game is playing. You can test out your game in this window by clicking the Play button in the top, center of the screen.
Hierarchy – lists all elements you have added to the scene. This is the main camera by default. You can create new elements by clicking Create and selecting the type of object you want. This can also be done by using the GameObject dropdown menu at the top of the screen.
Project – shows the files being used for the game. You can create folders, scripts, etc. by clicking Create under the Project window.
Inspector – this is where you customize aspects of each element that is in the scene. Just select an object in the Hierarchy window or double-click on an object in the Scene window to show its attributes in the Inspector panel.
Step 3: Save the Scene & Set Up the Build
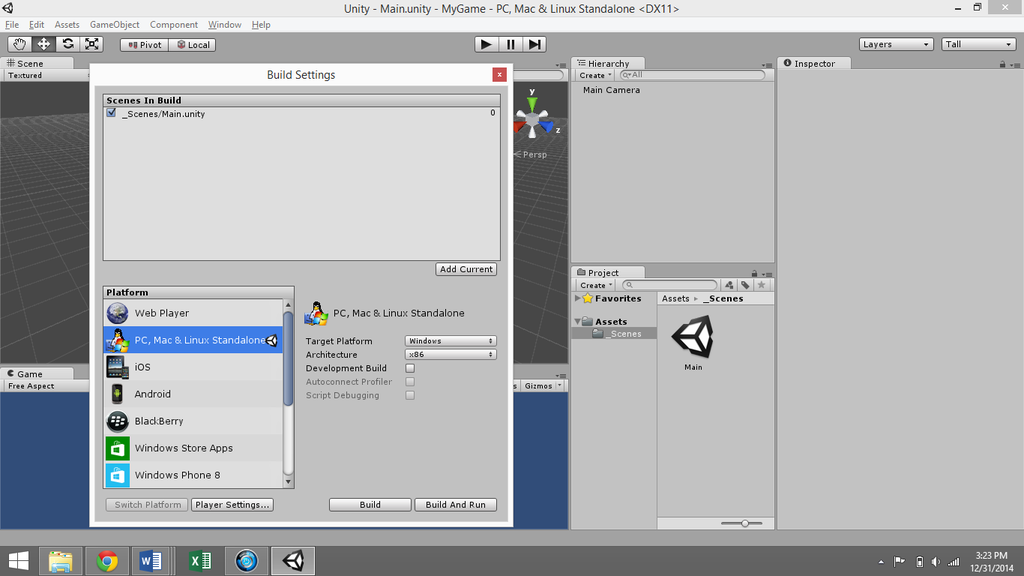
Click File – Save Scene. Save the scene under the folder [Project Name] – Assets. Assets is a pre-made folder into which you will want to store your scenes and scripts. You may want to create a folder called Scenes within Assets because the Assets folder can get messy.
Save the scene as Scene or Main or something like that.
Click File – Build Settings.
Add current scene to build.
Select desired platform. There are a lot of options, including computers, game systems, and smart phones, but if you are creating projects for the first time, you will most likely want to select Web Player or PC/Mac/Linux Standalone.
Click Player Settings at the bottom of the Build Settings window. This opens the Player Settings options in the Inspector. Here, you can change the company name, the product (game) name, default icon, etc.
Close out of the Build Settings window. You will come back to this when you are ready to finish your game.
Step 4: Create the Stage
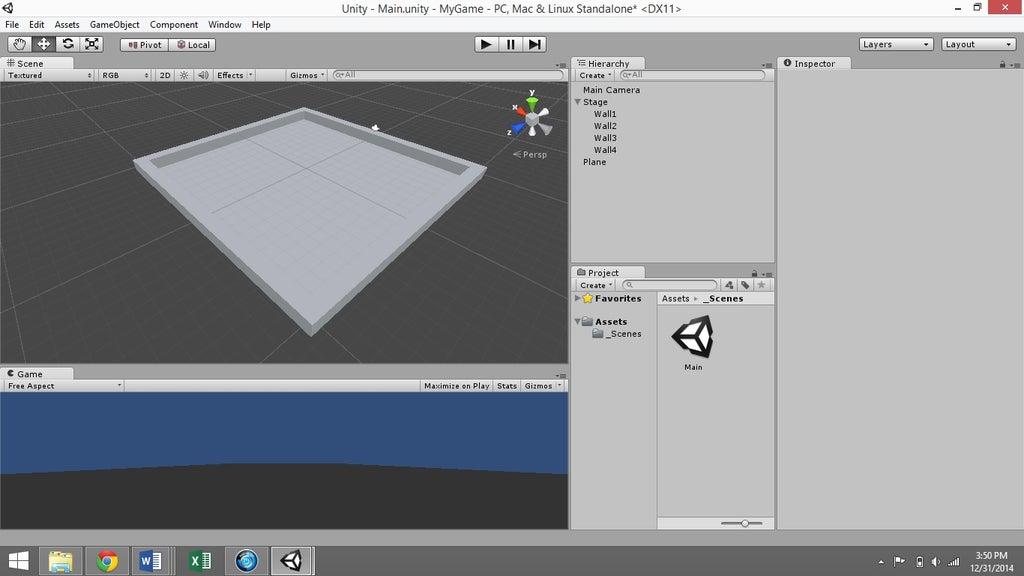
The simplest way to create a stage in Unity is to add cubes.
To do this, go to Game Object – Create Other – Cube, or use the Create menu in the Hierarchy window. Add a cube.
Reset the cube’s transform by right-clicking “Transform” in the Inspector panel. It is good practice to do this whenever you create a new Game Object.
Select the cube in the Hierarchy. Rename it “Wall” by double clicking its name in Hierarchy or using the Inspector panel.
Scale the cube in the X direction to make it long and wall-like.
Right click “Wall” in the Hierarchy panel, and duplicate it three times, so you have four walls. It will look like you only have one wall because they are identical and therefore occupying the same point in space. Drag them into position and/or use the transform options for each cube to make an arrangement that looks like an arena.
Note: To look around the scene view, click the middle mouse button to pan and scroll to zoom in and out. Click and drag while holding the ALT key to rotate the view.
Create an empty Game Object, using the Game Object dropdown (Create Empty) at the top of the screen. Call it “Stage.” Reset its transform.
Select all four “Walls” and drag them under the “Stage” Game Object.
Add a plane Game Object by selecting Create in the Hierarchy panel and use it for the floor. Rename it “Floor,” and drag it under Stage in the Hierarchy.
Note: you need to hit enter after renaming, or else the change may not take effect.
Give the floor a -0.5 transform in the Y-direction to ensure it lines up neatly with the four walls.
Make the floor’s scale in the X, Y, and Z directions 1/10 of the scale you used to size the walls.
Step 5: Create the Player
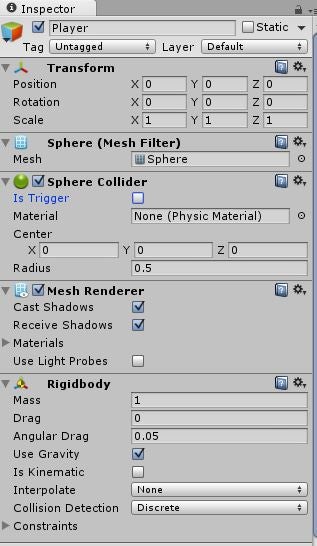
You can download characters from various places online, such as the Unity Store, but for this tutorial, we’re just going to use one of the built-in Game Objects for the player.
Go to Game Objects – Create Other – Sphere.
Select the sphere in the Hierarchy, and rename it “Player.” Reset its transform.
Now we need physics. Make the player subject to the laws of physics by clicking Add Component at the bottom of the Inspector panel with the player selected. Add Physics – Rigidbody. Leave all the default settings.
You will notice that each object comes with a variety of “components” added to it that you can see in the Inspector. Each cube, sphere, etc. has a component called a “collider.” This is the physical area of the screen where that object is considered to take up space. If you turn off a collider, than the object becomes like a ghost, able to pass through other objects. (See video for what happens when you turn off the player’s collider component.) You can turn components on and off by checking and unchecking the box next to the component’s name.
Step 6: Making the Player Move Around
Select the player in the Hierarchy.
Minimize components that you don’t want to see open in the Inspector by clicking the down arrows to the left of the name of each component. This will clear up your workspace a bit.
Click Add Component at the bottom of the Inspector window. Select New Script, name the script something like “PlayerController,” and choose a programming language. I use CSharp. Click Create and Add.
For the sake of keeping files organized, open the Assets folder in the Project window, and create a folder called Scripts. Put your new script in this folder.
To open the script for editing, double click the script’s name in the Inspector, or open it from the Project window. This opens a programming environment called MonoDevelop.
Note: If this is your first time coding, you should know that it can be really nitpicky. Make sure that you are consistent with spelling, cases, and having opening and closing brackets, parentheses, curly brackets, quotations, etc. Also, watch out for errors that result from not having a semicolon at the end of a line of code.
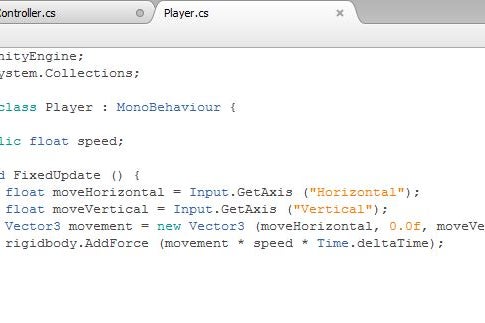
There should already be two sections included in your code by default: void Start () and void Update (). Start runs as soon as the object comes into the game, and update runs continuously while the object is in the game. We will add a third, called FixedUpdate to handle physics-related protocols. It should look like this:
void FixedUpdate () {

}
Before we can input commands, we need to declare variables. This is done toward the top of the page, within the curly brackets following Public Class PlayerController (or similar) : Monobehaviour, but before the void Start() function. For movement, we will use a variable called “speed,” which we can adjust to determine the speed at which our character moves around the arena. Declare the variable type (float) and name (speed) like so:
public float speed;
The semicolon tells the program that this is the end of the line of code. You will get an error if you forget to include a semicolon at the end of every/most line(s) of code, so don’t leave it out!
Under FixedUpdate, declare two more floats, moveHorizontal and moveVertical. These take on values depending on the user’s keyboard commands, and FixedUpdate updates them every frame.
float moveHorizontal = Input.GetAxis(“Horizontal”);
float moveVertical = Input.GetAxis(“Vertical”);
Case matters.
Still within FixedUpdate, create a new Vector3, a type of variable with three dimensions useful for moving objects around in 3D space. This will take on the value of the user’s input for horizontal and vertical movement, and will be zero in the up/down direction because in this game, the player can only move in two dimensions.
Vector3 movement = new Vector3(moveHorizontal,0.0f,moveVertical);
Finally, input a force on the player to move it around, using rigidbody.AddForce, a protocol built in to the player’s rigidbody component.
rigidbody.AddForce(movement*speed*Time.deltaTime);
Time.deltaTime is used to make movement smoother. We will adjust the speed variable later, in the Unity editor.
Save the CSharp file, and switch back to Unity.
Go to the Inspector panel for the player, and look at the movement script you have just created. There should be a box for your public variable, speed. You can change the value of public variables using the Inspector.
For now, make speed equal a number between 100-1000, and click the play button at the top, middle of the screen. You should be able to move the ball around using Unity’s default movement keys, either ASWD or the arrow keys.
Click the play button again to exit out of testing mode.
Step 7: Add Lighting
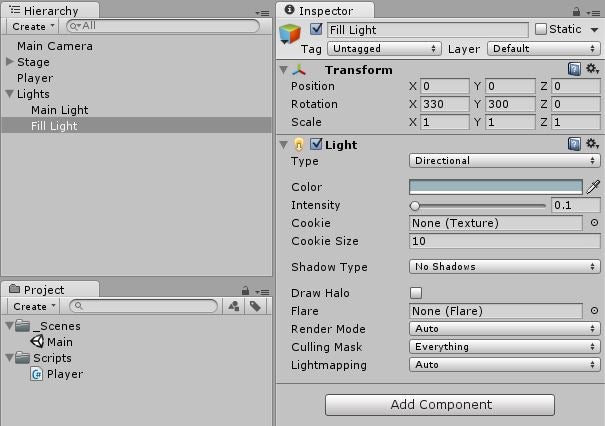
Create an empty Game Object and call it “Lights.” Do this by clicking GameObject in the top toolbar and selecting “create empty.”
Create a directional light by selecting the option from “create” toolbar in the Hierarchy panel. Name it “Main Light.” Make it a child object of Lights by dragging it in the Hierarchy onto the Lights game object. This is a similar concept to putting a file into a folder.
With Main Light selected, change the light settings in the Inspector panel by changing Shadow Type to “Soft Shadows” and Resolution to “Very High Resolution.”
In the Inspector panel, change the main light’s rotation to angle it down over the arena. I used 30X, 60Y, 0Z.
Right click the Main Light in the Hierarchy panel to duplicate it. Name the duplicate “Fill Light,” and child it under Lights.
Dampen the intensity of the Fill Light by changing the color to a light blue tint and reducing the Intensity field to 0.1 (in the Inspector).
Change Shadows to “No Shadows.”
Angle the Fill Light the opposite direction of the main light. For me, this was (330, 300, 0).
Step 8: Fine-tune the Camera Angle
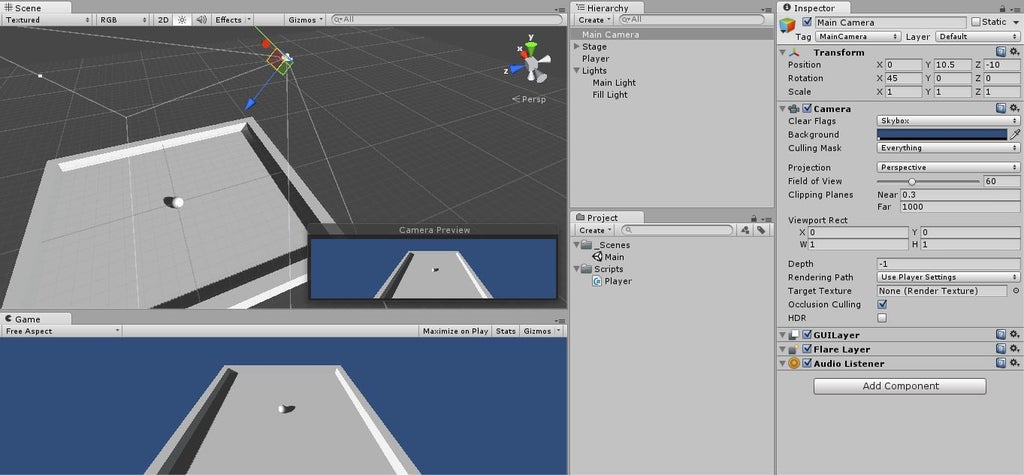
We want the camera to be angled down over the arena, so select the Main Camera in the Hierarchy, and adjust its transform until the image in camera preview (the bottom right of the Scene panel, with the camera selected) looks good.
I used (0, 10.5, -10) for position, and (45, 0, 0) for rotation.
You can also drag the camera around in the scene view to position it, if you wish
Step 9: Make the Camera Follow the Player
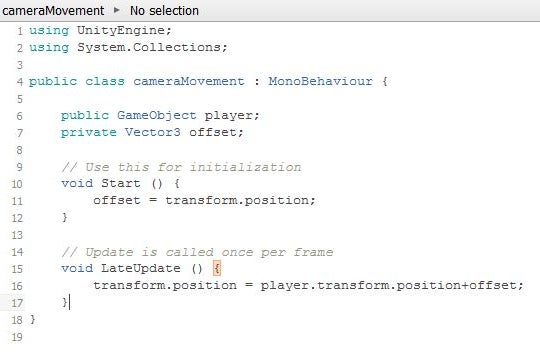
We want the camera to follow the player around the screen as it moves. For this purpose, create a script called “cameraMovement” by adding a new script component to the Main Camera in the Inspector panel. Double click the script to open it in MonoDevelop.
This script will access another Game Object, the player, so you must declare this before the script’s Start() function by writing
public GameObject player;
Create a Vector3 called “offset” by writing
private Vector3 offset;
Under the Start() function, assign the value of offset to be
offset=transform.position;
which is the (x,y,z) position of the camera.
Under a function called LateUpdate (), define the camera’s position as the player’s position plus some offset:
void LateUpdate () {
transform.position=player.transform.position+offset;}
Save the script and go back to Unity.
We need to assign a Game Object to the “player” we defined in the cameraMovement script. Select the Main Camera and look at the Inspector panel. Under the cameraMovement script, there should be a box called “Player.” It is currently assigned to None (GameObject). Drag the Player from the Hierarchy into this box to assign the player game object to the cameraMovement script.
Be sure to drag the new script into the scripts folder (in the Project panel), which you created under Assets.
Try out the game by clicking the play button at the top, center of the screen. You should be able to move the player around with the arrow keys and the camera should follow your movement.
Save the scene and save the project.
Step 10: Make Items
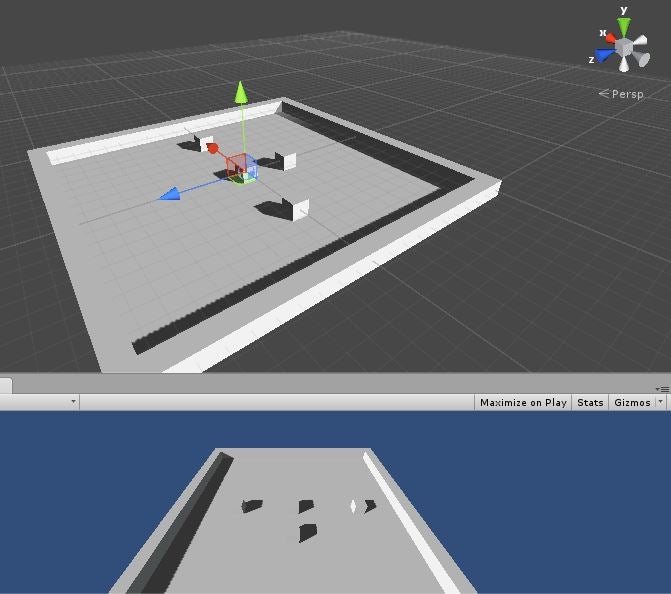
Create a new Game Object. It can be a sphere, a cube, a capsule, or a cylinder. I used a cube.
Call it “Item.”
Tag the Item as “item” by selecting Tags, and creating a new tag called “item,” then going back to Tags for that game object and selecting the new “item” tag that you created. Tag all your items as items. Make sure you match the spelling and capitalization exactly.
Place the Item into an empty Game Object called “Items.”
Reset their transforms.
Add a rigidbody to the Item.
Duplicate the Item a bunch of times and place the copies around the arena.
Step 11: Make the Player Collect the Items & Display the Score
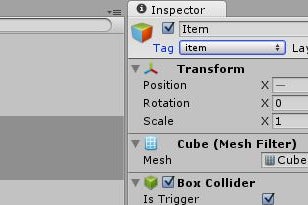
Open the player movement script from the Inspector panel with the Player game object selected, and modify the script to allow the player to collect, and keep track of, the items it has collected.
Make two declarations: one is a variable that keeps track of your score, and the other is a GUI text that will display your score on the scene view.
private int count;
public GUIText countText;
Under the function void Start(), initialize count and CountText, a function we will write later.
count=0;
CountText();
Write a new function for what happens when the Player collides with the Items. This should be its own section, just like the void Start() and void Update sections.
void OnTriggerEnter(Collider other){
	if (other.gameObject.tag == “item”)
{other.gameObject.SetActive(false);
count=count+1;
CountText();}
}
Write the CountText function, which will update the score on the GUI display.
Void CountText(){
countText.text="Count: " + count.ToString();
}
Save the code and switch back to Unity.
Select all your items, make sure they are tagged as items, and check the button “Is Trigger” in the Box Collider component of the Inspector.
Also check the “Is Kinematic” button under rigidbody. This prevents your items from falling through the floor, essentially by turning off gravity.
For the countText, create a new GUI (graphical user interface) Text using the Create option under Hierarchy.
Set the GUI Text’s transform to (0,1,0) and give it a pixel offset of (10, -10) in the GUIText component on the Inspector panel.
Drag the GUI Text into the Count Text box on the Inspector with the Player selected.
Step 12: Make Hazards
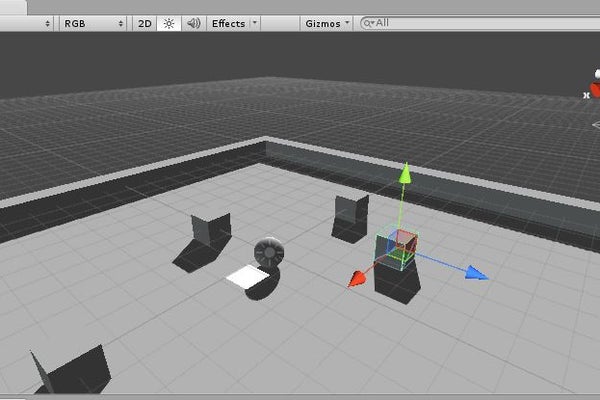
These hard-to-see panels will launch the player into the air, and possibly over the edge of the arena, in which case it will be game over. Making hazards is a similar process to making items.
Create new empty game object called “Hazards.”
Create a new Quad and call it “Hazard.”
Tag it as hazard, and check “Is Trigger.”
Change its color so you can see it by selecting Mesh Renderer in the Inspector, with the hazard selected, and changing its material. Click the drop-down by Materials, and use the little gray circle to the right of the box to select a different material than the default gray one for the hazard. I had a white material pre-installed, so I used that.
Change the hazard’s rotation to 90 about the X axis and lower its Y height to -0.4 so it is a small white square lying just over the floor of the arena.
Edit the Player script, under the OnTriggerEnter() function, so that it accounts for the possibility that the object the player runs into is a hazard, and not an item. Tell the player to jump if it hits the hazard.
void OnTriggerEnter(Collider other){
		if(other.gameObject.tag=="item"){
			other.gameObject.SetActive(false);
			count = count + 1;
			CountText();
		}
		if(other.gameObject.tag=="hazard"){
			other.gameObject.SetActive(false);
			Vector3 jump = new Vector3(0.0f, 30, 0.0f);
			rigidbody.AddForce (jump * speed * Time.deltaTime);
		}
Save the code,go back to the Unity editor, and duplicate the hazard a few times.
Position the hazards around the arena, and try out the game!


