


Failure is Not the End: It’s the Beginning of Growth
20th April 2026
Can AI Replace Manual Testers?
20th May 2026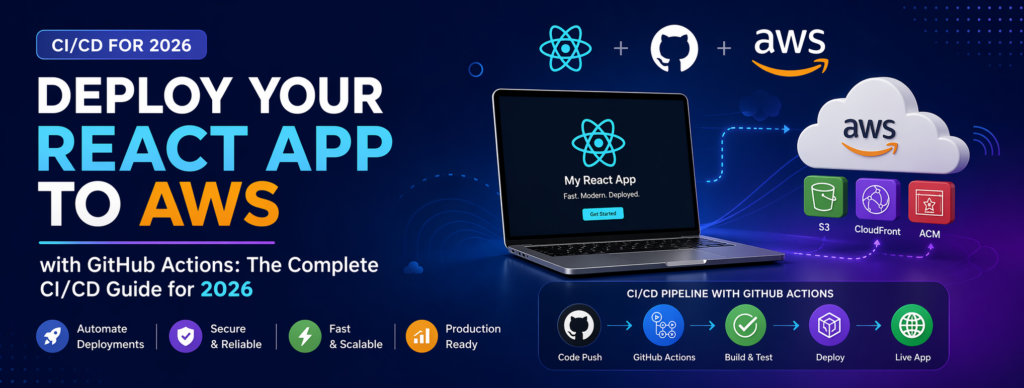
If you’re still manually running npm run build and dragging files into an S3 bucket every time you push an update, you’re wasting hours every month. Worse, you’re leaving room for human error — wrong file uploaded, cache not cleared, stale content reaching production, missing environment variables. The professional solution is a proper CI/CD (Continuous Integration and Continuous Deployment) pipeline that handles all of this automatically, every single time.
In this comprehensive guide, you’ll build a production-grade pipeline that takes your React application from a simple GitHub push to a live, globally-distributed production deployment on AWS — all without lifting a finger after the initial setup. We’ll use Amazon S3 for storage, CloudFront for global content delivery, IAM for secure access, and GitHub Actions as the automation engine that ties everything together.
By the end of this tutorial, every merge to your main branch will automatically run your tests, build your app, deploy it to AWS, and invalidate CDN caches — all in under three minutes. We’ll also cover advanced topics like multi-environment setups, preview deployments for pull requests, proper cache strategies, cost optimization, and security best practices that most tutorials skip entirely.
Why Choose AWS Instead of Vercel or Netlify?
Vercel and Netlify are excellent choices for solo developers and small projects. They handle deployment magic out of the box, require minimal configuration, and offer generous free tiers. So why would you go through the additional complexity of setting up AWS? There are several genuinely good reasons.
First, enterprise compliance. Many organizations have strict data residency requirements or security certifications (HIPAA, SOC 2, PCI-DSS) that are easier to maintain with AWS’s mature compliance framework. Second, cost predictability at scale. While Vercel’s pricing is simple, it can become expensive quickly as your traffic grows — AWS’s S3 + CloudFront combination often costs 60-80% less at scale. Third, integration with existing infrastructure. If your backend already runs on AWS (Lambda, EC2, RDS), keeping the frontend on the same platform simplifies networking, monitoring, and billing.
Finally, there’s the learning value. Understanding how to deploy on raw AWS services makes you a better engineer. You’ll understand what platforms like Vercel are doing under the hood, which helps you debug issues and make better architectural decisions. This knowledge transfers across companies and projects in ways that platform-specific knowledge does not.
What You’ll Need Before Starting
Before diving in, make sure you have the following set up. You need a React application (Create React App, Vite, Next.js with static export, or any similar framework) pushed to a GitHub repository. You need an AWS account with billing enabled — don’t worry, the services we’ll use fall within the free tier for small applications. Install the AWS CLI on your local machine so you can test commands manually and troubleshoot issues when they arise. Node.js version 18 or higher should be installed locally. A basic understanding of YAML syntax will help when we write the workflow file, but it’s not strictly required since we’ll explain everything.
It’s also helpful to have a custom domain name if you’re planning to deploy a real production app, though CloudFront’s default domain works perfectly fine for testing. We’ll mention how to attach a custom domain at the end, but the core pipeline works identically either way.
Understanding the Architecture Before We Build
Let’s take a moment to understand what we’re actually building, because grasping the big picture makes every subsequent step easier. When a user visits your app, their browser sends a request that hits the nearest CloudFront edge location — these are servers AWS maintains in over 400 cities worldwide. If CloudFront has the requested file cached (HTML, JS, CSS, images), it serves it instantly from that edge. If not, CloudFront fetches the file from your S3 bucket, caches it, and serves it to the user.
Meanwhile, GitHub Actions sits in the middle of your development workflow. Every time you push code to your main branch, GitHub triggers a workflow that checks out your code on a fresh virtual machine, installs dependencies, runs tests, builds your production bundle, uploads the resulting files to S3, and tells CloudFront to clear its cache so users get the latest version. The entire pipeline is defined in a single YAML file that lives in your repository.
This architecture gives you exceptional performance (global CDN), reliability (S3 has 99.99% availability), and cost efficiency (you only pay for storage and bandwidth actually used). It’s the same fundamental setup that powers millions of websites, including many you use every day.
Step 1: Create and Configure Your S3 Bucket
Log into the AWS Console and navigate to the S3 service. Click the “Create bucket” button to start a new bucket. Give it a globally unique name — something like yourcompany-myapp-prod-frontend. Bucket names must be unique across all of AWS, not just your account, so you’ll often need to add a suffix or identifier. Choose the AWS region closest to the majority of your users, though this matters less than you’d think since CloudFront will handle global distribution regardless.
Here’s the critical decision most tutorials get completely wrong: keep the bucket fully private. Leave “Block all public access” enabled. Do not turn on static website hosting. Both of these settings are remnants of older AWS best practices that have been superseded by more secure approaches. We’ll serve files through CloudFront using Origin Access Control (OAC), which is dramatically more secure than exposing S3 directly.
After creating the bucket, you’re done with S3 for now. Don’t upload any files yet — GitHub Actions will handle that automatically. Take note of the exact bucket name because you’ll need it in later steps. Navigate to the bucket’s Properties tab and verify that server-side encryption is enabled using Amazon S3 managed keys (SSE-S3). This should be enabled by default for new buckets, but it’s worth confirming for peace of mind.
Step 2: Set Up a CloudFront Distribution
In the AWS Console, open CloudFront and click “Create distribution.” In the Origin section, click the dropdown for Origin domain and select your S3 bucket from the list — make sure you pick the bucket itself, not its website endpoint (which we didn’t configure anyway). For “Origin access,” choose “Origin access control settings” and create a new OAC. This tells CloudFront to authenticate itself when requesting files from your private bucket.
In the Default cache behavior section, set Viewer protocol policy to “Redirect HTTP to HTTPS.” Modern web security essentially requires HTTPS everywhere, and CloudFront provides free SSL certificates. Under Cache key and origin requests, the default CachingOptimized policy works well for most React apps. Enable compression to automatically gzip and brotli-compress responses, which dramatically reduces transfer sizes.
In the Settings section, set the Default root object to index.html. This ensures that when users visit your base URL, they get your React app’s entry point instead of an XML directory listing. Leave Price class at “Use all edge locations” if you have global users, or choose the cheaper options if your audience is regional.
After clicking Create, CloudFront will take 10-15 minutes to deploy your distribution globally. While it deploys, click on your distribution and copy the bucket policy that CloudFront generates. You need to paste this into your S3 bucket’s permissions tab — it’s the policy that allows only CloudFront (not the public) to read from your bucket. This step is easy to miss and results in “Access Denied” errors if skipped.
One more critical configuration: navigate to the Error pages tab in your CloudFront distribution. Add a custom error response for HTTP 403 errors — set the response path to /index.html and the response code to 200. Repeat this for 404 errors. This configuration is essential for single-page applications using React Router. Without it, users who refresh the page on any non-root route will see CloudFront’s default “Access Denied” error instead of your app.
Step 3: Create a Dedicated IAM User for Deployments
Never use your root AWS credentials for automation. This is non-negotiable. Head to the IAM service and create a new user called something descriptive like github-actions-myapp-deployer. When prompted about access type, skip the console access option — this user only needs programmatic access via API keys.
Rather than attaching an overly broad policy like AmazonS3FullAccess, create a custom policy that follows the principle of least privilege. This user should only be able to write to your specific S3 bucket and create invalidations on your specific CloudFront distribution — nothing more. Here’s the policy JSON you should use:
{
  "Version": "2012-10-17",
  "Statement": [
    {
      "Sid": "AllowS3Sync",
      "Effect": "Allow",
      "Action": [
        "s3:PutObject",
        "s3:DeleteObject",
        "s3:GetObject",
        "s3:ListBucket"
      ],
      "Resource": [
        "arn:aws:s3:::your-bucket-name",
        "arn:aws:s3:::your-bucket-name/*"
      ]
    },
    {
      "Sid": "AllowCloudFrontInvalidation",
      "Effect": "Allow",
      "Action": [
        "cloudfront:CreateInvalidation"
      ],
      "Resource": "arn:aws:cloudfront::YOUR-ACCOUNT-ID:distribution/YOUR-DISTRIBUTION-ID"
    }
  ]
}
Replace your-bucket-name, YOUR-ACCOUNT-ID, and YOUR-DISTRIBUTION-ID with your actual values. This policy is incredibly tight — if someone steals these credentials, the worst they can do is redeploy your existing app or delete your frontend files (which you can restore from a git push). They can’t access other buckets, can’t spin up EC2 instances, can’t rack up a massive bill on your behalf.
After creating the user and attaching the policy, generate an access key pair. Copy both the Access Key ID and Secret Access Key to a secure location — you’ll only see the secret once, so don’t close that tab until you’ve saved it. If you lose the secret, you’ll need to generate a new key pair.
Step 4: Store Your Credentials as GitHub Secrets
Open your GitHub repository in a browser, navigate to Settings, then click on “Secrets and variables” in the left sidebar, followed by “Actions.” This is where GitHub stores sensitive values that get injected into your workflows at runtime without ever appearing in logs or code.
Add the following four repository secrets. Name the first one AWS_ACCESS_KEY_ID and paste in the Access Key ID from the previous step. Name the second AWS_SECRET_ACCESS_KEY and paste in the secret key. Create AWS_S3_BUCKET with your bucket name as the value. Finally, add CLOUDFRONT_DISTRIBUTION_ID with the distribution ID from your CloudFront console (it looks something like E1A2B3C4D5E6F7).
Never commit these values to your repository, not even temporarily. GitHub Secrets are masked automatically in workflow logs — even if someone tries to echo them, they’ll appear as asterisks. This masking is a critical security feature that prevents accidental credential leaks.
Step 5: Write the GitHub Actions Workflow File
Create a new file in your project at the path .github/workflows/deploy.yml. The two dot-separated directories are important — GitHub specifically looks for workflows in this location. Here’s a production-ready workflow that handles everything:
name: Deploy to AWS

on:
  push:
    branches: [main]
  workflow_dispatch:

concurrency:
  group: production-deploy
  cancel-in-progress: false

jobs:
  build-and-deploy:
    runs-on: ubuntu-latest
    timeout-minutes: 10

    steps:
      - name: Checkout code
        uses: actions/checkout@v4

      - name: Setup Node.js
        uses: actions/setup-node@v4
        with:
          node-version: '20'
          cache: 'npm'

      - name: Install dependencies
        run: npm ci

      - name: Run linter
        run: npm run lint

      - name: Run tests
        run: npm test -- --watchAll=false --passWithNoTests

      - name: Build project
        run: npm run build
        env:
          REACT_APP_API_URL: ${{ secrets.REACT_APP_API_URL }}

      - name: Configure AWS credentials
        uses: aws-actions/configure-aws-credentials@v4
        with:
          aws-access-key-id: ${{ secrets.AWS_ACCESS_KEY_ID }}
          aws-secret-access-key: ${{ secrets.AWS_SECRET_ACCESS_KEY }}
          aws-region: ap-south-1

      - name: Sync static assets to S3 (long cache)
        run: |
          aws s3 sync build/static/ s3://${{ secrets.AWS_S3_BUCKET }}/static/ \
            --delete \
            --cache-control "public, max-age=31536000, immutable"

      - name: Sync HTML and root files to S3 (no cache)
        run: |
          aws s3 sync build/ s3://${{ secrets.AWS_S3_BUCKET }}/ \
            --delete \
            --exclude "static/*" \
            --cache-control "public, max-age=0, must-revalidate"

      - name: Invalidate CloudFront cache
        run: |
          aws cloudfront create-invalidation \
            --distribution-id ${{ secrets.CLOUDFRONT_DISTRIBUTION_ID }} \
            --paths "/*"
Let’s break down what’s happening because there’s some clever stuff in this workflow. The concurrency block prevents multiple deployments from running simultaneously, which avoids race conditions where an older build overwrites a newer one. The workflow_dispatch trigger allows you to manually run the workflow from the Actions tab — useful for re-deploying without pushing new code.
The crucial detail is the split sync strategy. Static assets (JS, CSS, images generated by Webpack) get a one-year cache because their filenames include content hashes — when the content changes, the filename changes too, so caching them aggressively is safe and fast. The HTML file, on the other hand, gets no cache at all because it always has the same name but points to the latest hashed assets. This combination gives you both blazing-fast repeat visits and instant updates when you deploy.
Step 6: Trigger Your First Deployment
Commit the workflow file and push to your main branch. Open the Actions tab on GitHub and you should see your workflow running. Click into it to watch each step execute in real-time. The first run typically takes two to three minutes — subsequent runs are often faster thanks to the npm cache we configured.
Once the workflow finishes successfully, open your CloudFront distribution URL in a browser (it looks like d1a2b3c4d5e6f7.cloudfront.net). Your React app should load perfectly. Make a small change — update some text in a component — commit and push. Within two to three minutes, your change will be live globally.
If something fails, don’t panic. Click the failed step in GitHub Actions to see the exact error message. Common issues include typos in secret names, missing IAM permissions, or a bucket name mismatch. The error messages are usually specific enough to point you to the problem.
Handling Environment Variables Properly
Most real React apps need environment variables — API endpoints, feature flags, analytics keys, and so on. In Create React App, these variables must be prefixed with REACT_APP_, while Vite uses the VITE_ prefix. Here’s the crucial security rule: any environment variable included in your build is publicly visible in the resulting JavaScript files. Never put secrets like API private keys, database credentials, or payment processor secret keys in frontend environment variables.
For public values (public API keys, endpoint URLs, feature flags), store them as GitHub Secrets and pass them during the build step, as shown in the workflow above. For different values between environments (staging vs production), you can use GitHub Environments feature, which allows per-environment secrets with different values under the same name.
If you’re using a backend that requires truly secret values (like a paid API that bills based on usage), the solution is to proxy those requests through your own backend — never expose secrets directly to the browser. Services like AWS Lambda or API Gateway work well for this pattern alongside a CloudFront-hosted frontend.
Setting Up Multiple Environments
A single production pipeline is fine for personal projects, but real teams need staging and production environments at minimum. The setup is straightforward: create a second S3 bucket (like myapp-staging-frontend) and a second CloudFront distribution for staging. Then create two separate workflows, or one workflow with conditional logic.
The cleaner approach is using GitHub Environments. Go to your repository settings, navigate to Environments, and create two environments called “staging” and “production.” Each environment can have its own set of secrets with the same names but different values. Your workflow can target a specific environment like this:
jobs:
  deploy:
    runs-on: ubuntu-latest
    environment:
      name: ${{ github.ref == 'refs/heads/main' && 'production' || 'staging' }}
    steps:
      # ... same steps as before, but secrets now come from environment
This pattern lets pushes to your main branch deploy to production and pushes to a develop branch deploy to staging. You can also add required reviewers to the production environment, meaning deployments to production require manual approval from a designated team member — a fantastic safety net.
For even more advanced setups, consider per-pull-request preview deployments. Each open PR gets its own unique URL, allowing stakeholders to review changes live before they’re merged. The implementation involves creating bucket prefixes or separate CloudFront behaviors based on the PR number, and is a topic deserving its own dedicated tutorial.
Cache Strategy Deep Dive
Let’s revisit caching because it’s one of the most misunderstood parts of modern web deployment. When a user first visits your app, their browser downloads HTML, JS, CSS, and images. On subsequent visits, reloading every file wastes bandwidth and slows things down. Proper caching tells the browser and CloudFront when to serve from cache versus fetch fresh.
React’s build process (both CRA and Vite) generates filenames like main.a3b5c7d9.js — that hex string is a hash of the file’s contents. When you make changes, the hash changes, producing a new filename like main.e1f3g5h7.js. This pattern is called “cache busting” and it lets you cache these files essentially forever because a new deployment produces new filenames that bypass any cached version.
Your index.html file is different — it always has the same name but needs to tell the browser about the latest hashed filenames. If you cache index.html aggressively, users will keep loading the old version that points to old asset files, which may no longer exist. That’s why our workflow sets max-age=0 for HTML and max-age=31536000, immutable (one year) for the static folder.
The cache invalidation we trigger after deployment is a belt-and-suspenders approach — it forces CloudFront to discard its cached copy of index.html immediately, even if the cache headers hadn’t quite expired. Invalidations cost money after the first 1,000 per month, but for normal deployment volumes you’ll never hit that limit.
Monitoring Your Deployments with CloudWatch
A deployed app that nobody’s watching is a ticking time bomb. AWS CloudWatch lets you monitor every aspect of your CloudFront distribution and S3 bucket without adding any code to your application. Open CloudWatch and create a dashboard with widgets showing requests per second, error rates (4xx and 5xx), cache hit ratio, and total bytes transferred.
Set up CloudWatch alarms for critical metrics. A spike in 5xx errors might indicate a broken deployment or AWS-side issue. An unusually high 4xx error rate could mean users are hitting broken links. A dramatic drop in cache hit ratio might indicate that your cache configuration regressed. Alarms can send notifications via email, SMS, or Slack integration through Amazon SNS.
For even deeper insights into user behavior, consider enabling CloudFront real-time logs or integrating a tool like Datadog, New Relic, or Sentry. Client-side error tracking with Sentry is particularly valuable because AWS can’t tell you when JavaScript errors happen in the browser — only the user’s browser knows that.
Common Pitfalls and Troubleshooting
Let’s cover the issues that trip up nearly every developer the first time they build this pipeline. If you see “Access Denied” errors when deploying, the culprit is almost always IAM permissions — double-check that your policy includes s3:PutObject, s3:DeleteObject, s3:ListBucket, and that the resource ARNs exactly match your bucket name.
If your app loads on the root URL but breaks on refresh for any sub-route, you forgot to configure the 403/404 redirects in CloudFront Error pages. This is a React Router issue, not an AWS bug — deep links require explicit redirection to index.html because S3 has no concept of client-side routing.
If old content keeps appearing even after successful deployments, check three things in order. First, verify the invalidation step ran successfully in your GitHub Actions logs. Second, check your browser’s dev tools Network tab and look at the response headers — if you see X-Cache: Hit from cloudfront with old timestamps, the invalidation hasn’t propagated yet (wait a minute). Third, check your cache-control headers on the actual files in S3 to make sure the sync step applied them correctly.
If builds fail intermittently with “EACCES” or dependency errors, your package-lock.json might be out of sync with package.json. Run npm install locally, commit the updated lock file, and push again. Also ensure you’re using npm ci rather than npm install in your workflow — ci is stricter and more reproducible.
Security Best Practices for Production
Security isn’t a one-time setup; it’s an ongoing practice. Rotate your IAM access keys at least every 90 days. AWS IAM can send you reminders when keys are old. When you rotate, generate a new key, update the GitHub secret, verify a deployment works, then delete the old key. This rotation takes five minutes and dramatically reduces risk from old credential leaks.
Enable AWS CloudTrail for your account if it isn’t already. CloudTrail logs every API call made in your AWS account, including deployments, IAM changes, and credential usage. If an incident ever occurs, CloudTrail logs are invaluable for forensics. Store these logs in a separate, restricted S3 bucket with object lock enabled to prevent tampering.
Consider using OIDC (OpenID Connect) instead of long-lived access keys. GitHub Actions supports OIDC to authenticate directly with AWS IAM using short-lived tokens, eliminating the need to store access keys in GitHub Secrets entirely. The setup is more involved but significantly more secure. AWS has detailed documentation on configuring GitHub OIDC as a trusted identity provider.
Always enable MFA on your root AWS account and any IAM users with console access. Never share credentials across projects or team members — each person should have their own IAM user with only the permissions they need. Review IAM permissions quarterly and remove anything no longer required.
Cost Optimization for Your Pipeline
The entire setup we’ve built typically costs less than a dollar per month for small to medium applications, but costs can surprise you if you’re not careful. S3 charges for storage, requests, and data transfer out. CloudFront charges primarily for data transfer and requests. For most React apps, data transfer is the largest line item.
Enable CloudFront compression to reduce transfer sizes by 60-80%. Use the correct price class based on your audience — if all your users are in one region, there’s no point paying for edge locations in regions they’ll never visit. Consider using S3 Intelligent-Tiering if you have large files that are rarely accessed, though for typical React apps the standard tier is fine.
Set up AWS Budgets to alert you when monthly costs exceed expected thresholds. A reasonable starting alert might be five dollars per month — if you cross that threshold, something unusual is happening and you should investigate. Unusual cost spikes often indicate misconfigured caching (causing repeat origin fetches) or actual traffic growth that’s worth celebrating.
Adding a Custom Domain
To point your own domain (like app.yoursite.com) at your CloudFront distribution, you need to do two things. First, request an SSL certificate for your domain in AWS Certificate Manager — but make sure you request it in the us-east-1 region, because CloudFront only accepts certificates from that region regardless of where your distribution lives.
Once the certificate is validated (which involves adding DNS records to your domain), attach it to your CloudFront distribution in the General settings and add your domain name to the “Alternate domain names” field. Finally, create a CNAME record in your DNS provider pointing your domain to the CloudFront distribution domain. After DNS propagates (anywhere from minutes to hours), your custom domain will serve your React app over HTTPS.
Taking Your Pipeline Further
Once the fundamentals work, there’s enormous room to enhance your pipeline with advanced capabilities. Add Lighthouse CI as a build step to catch performance regressions before they ship — it’ll score your build against performance budgets and fail the pipeline if scores drop below your thresholds. Integrate Playwright or Cypress for end-to-end testing against preview deployments to catch bugs that unit tests miss.
For production-critical applications, explore blue-green deployment strategies using CloudFront origin groups. This pattern deploys a new version to a separate “green” environment, runs smoke tests against it, and only then switches traffic over — with instant rollback capability if anything goes wrong. It’s more complex but eliminates deployment downtime entirely.
Consider adding automated security scanning with tools like Snyk or npm audit as workflow steps. Bundle size monitoring with size-limit prevents your JavaScript bundles from gradually bloating. Automated dependency updates with Renovate or Dependabot keep your packages current without manual effort. Each of these additions compounds, turning your pipeline into a comprehensive quality gate.
Wrapping Up
You now have a proper CI/CD pipeline that automatically builds, tests, and deploys your React application to AWS — the same tooling and patterns used by professional engineering teams at companies of all sizes. The tedious manual deployment routine is gone for good, replaced by a reliable, repeatable system that ships code safely every time you push to main.
More importantly, you understand how the pieces fit together. You know why we use CloudFront instead of serving S3 directly, why we cache static assets differently from HTML, why IAM permissions should be minimal, and how to monitor everything once it’s running. This knowledge compounds across projects and platforms — the same principles apply whether you’re deploying to AWS, Google Cloud, Azure, or anywhere else.
Start with the basics covered here, then gradually layer in the advanced capabilities as your project grows. Each enhancement — staging environments, preview deployments, Lighthouse CI, bundle budgets — makes your pipeline more robust. Automation is the most valuable skill a modern developer can cultivate, and you’ve just built a foundation that will save you hundreds of hours over the life of your project. Now go ship something great.

