

How to Send 1 Million Notifications Without Taking Down Your App
2 September 2026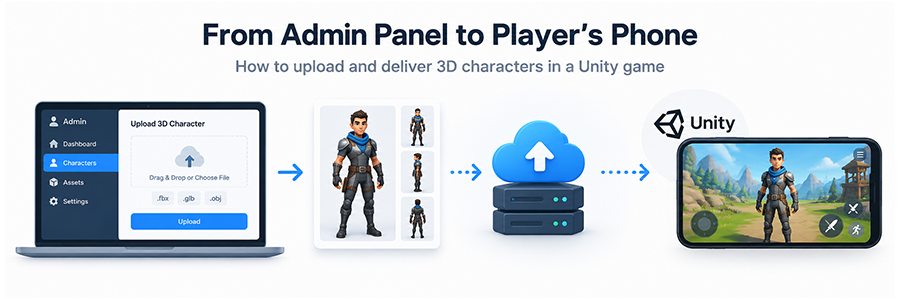
From Admin Panel to Player’s Phone
How to upload and deliver 3D characters in a Unity game
Every live game eventually wants to add a new character, skin or emote without releasing a new app version. Your team uploads a 3D model in an admin panel, presses Publish, and a few minutes later players see it in the store.
It sounds simple, but a lot happens behind that button. In this guide we’ll follow one character, Ninja, from the admin’s laptop all the way to a player’s screen. You’ll learn the full flow, the database design, the APIs, and the two rules that keep everything fast and safe.
The examples use Fastify, Zod, Knex, Postgres, Redis, AWS S3 and CloudFront, but the ideas work with any stack.
The five parts of the system
Before we start, meet the players:
| Part | What it does |
|---|---|
| Admin Panel | The website your team uses to create and edit items |
| API server | Checks permissions, validates data, makes decisions |
| Postgres + Redis | Postgres stores everything permanently; Redis is a fast cache |
| S3 + CloudFront | S3 stores the big files; CloudFront (a CDN) delivers them quickly worldwide |
| Unity Game | The app on the player’s phone |
A simple way to picture it: the admin is a chef creating a new dish, the API is the manager who approves everything, the database is the order book, S3 is the storage room, the CDN is the delivery bikes, and the game is the customer.
The two golden rules
Everything in this design follows from two rules.
Rule 1: Big files never pass through your API. 3D models are 5–50 MB. Your API probably accepts request bodies of a few hundred KB at most. Pushing large files through your server makes it slow and expensive. Instead, the API hands out a permission slip (a presigned URL) and the browser uploads directly to S3. The game downloads directly from the CDN too.
Rule 2: The game only reads a published snapshot. Admins edit drafts all day. If the game read those live tables, players would see half-finished work. So when the admin presses Publish, the API freezes everything into one JSON document (a manifest), and the game only ever reads that.
The big picture
Big files skip the API: uploads and downloads go straight to S3
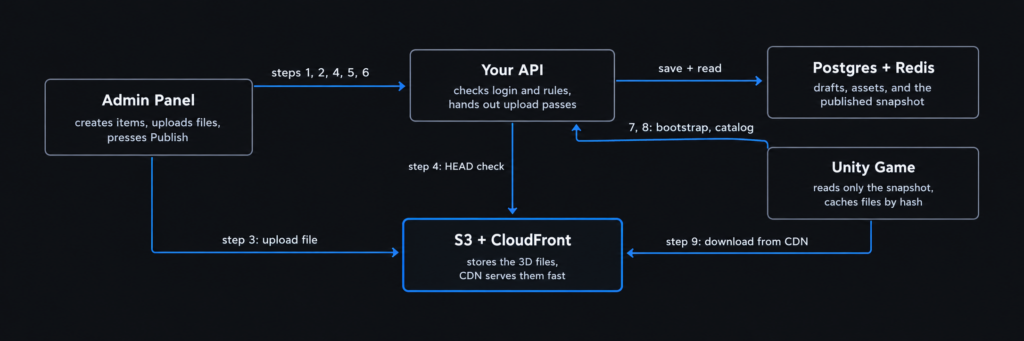
The admin talks to the API for every step except the upload itself, and the game talks to the API only for the version check and the item list. The two highlighted paths carry the big 3D files, and both go straight to S3.
Designing the database
You need four tables.
| Table | What it holds |
|---|---|
characters | Each playable character: a unique key like ninja, name, rarity, price, and a status that moves from draft to active to retired |
cosmetics | Skins, emotes, frames and similar items. A skin points to its character through character_id |
content_assets | One row per uploaded file: owner (character or cosmetic), kind (model or thumbnail), platform (android, ios or any), S3 path, size, sha256 fingerprint, and a status of pending, ready or superseded |
config_versions | Each published manifest: a frozen JSON copy of all active items and their ready files |
characters 1 ──── * cosmetics        (a skin belongs to a character)
characters 1 ──── * content_assets   (android model, ios model, thumbnail)
cosmetics  1 ──── * content_assets
config_versions = frozen snapshot of everything that's live

Separating items from their files is important. One character needs several files, and you'll replace files over time without touching the character itself.
Step 1: Create the item
The admin fills in a form and the panel sends:
POST /v1/admin/characters
Authorization: Bearer <admin_jwt>

{ "key": "ninja", "name": "Ninja", "rarity": "epic",
  "price_currency": "gems", "price_amount": "500" }
The API checks the admin’s token and permission, saves the row with status draft, and writes an audit log entry. Draft items are invisible to players. They exist only in the “kitchen.”
The same pattern gives you list, get and update endpoints (GET, PATCH) for both characters and cosmetics.
Step 2: Ask for an upload URL
The admin picks ninja.bundle. Before uploading, the browser calculates two things: the file’s size and its sha256 hash, a fingerprint that changes if even one byte changes.
The browser then asks the API for permission:
POST /v1/admin/assets/upload-url

{ "owner_type": "character", "owner_id": "c1…",
  "kind": "model", "platform": "android",
  "size_bytes": 18234567, "sha256": "9f2c…" }
The API checks that the character exists and the admin can edit it, then inserts a content_assets row with status pending. Finally it creates a presigned URL:
const cmd = new PutObjectCommand({
  Bucket: config.aws.assets_bucket,
  Key: key,
  ContentType: content_type,
  ContentLength: size_bytes,
});
const url = await getSignedUrl(s3, cmd, { expiresIn: 900 });
A presigned URL is like a 15-minute guest pass. It allows exactly one file, of exactly this size, to be placed at exactly this path. After 15 minutes it stops working.
Why the hash goes in the file path
The S3 key is built like this:
content/character/c1…/model/android/9f2c….bundleBecause the fingerprint is part of the name, every new version of a model gets a new path. Files are never overwritten. That means the CDN and the player’s phone can cache them forever without ever serving a stale version.
Step 3: Upload directly to S3
Now the browser uses the URL:
await fetch(upload_url, {
  method: "PUT",
  body: file,
  headers: { "Content-Type": "application/octet-stream" },
});
The file goes straight from the browser to S3. Your API never touches it. That’s Rule 1 in action.
Remember to configure CORS on your S3 bucket so the admin panel’s domain is allowed to send PUT and HEAD requests.
Step 4: Confirm the upload
The browser tells the API it’s finished with POST /v1/admin/assets/a1…/confirm.
The API doesn’t just trust the browser. It asks S3 using a HEAD request, which returns the file’s details without downloading it:
const head = await storage.headObject(asset.s3_key);
if (!head) throw new ConflictError("upload_missing");
if (head.size_bytes !== Number(asset.size_bytes))
  throw new ConflictError("size_mismatch");
If everything matches, the asset becomes ready. If there was already a ready file in the same slot (say, an older Android model), it becomes superseded. It stays in S3, because older published versions may still point to it.
Repeat steps 2–4 for each slot: Android model, iOS model and thumbnail.
Step 5: Activate, retire or delete
When the files are ready, the admin clicks Activate, which moves the item from draft to active. Players still can’t see it. Active only means “approved for the next release.”
- Retire (
active→retired) hides an item from the store, but players who own it keep it. - Delete only works on drafts. Once an item has been live, someone may own it, and deleting it would break their inventory. The API returns
409with “Retire it instead.”
Step 6: Publish
This is the moment the item goes live. The API:
- Collects every active character and cosmetic plus their ready files.
- Runs safety checks: does every item have an Android model, an iOS model and a thumbnail? Is every skin’s character active? Does every non-default item have a price?
- Builds a single JSON manifest and signs it.
- Saves it in
config_versionsaspublished, archives the old one, and copies it into Redis.
const manifest = {
  config_version_id: id,
  catalog: {
    cdn_base_url: config.aws.media_base_url,
    characters: characters.map((c) => ({ ...pickPublic(c), ...groupAssets(assets, c.id) })),
    cosmetics: cosmetics.map((x) => ({ ...pickPublic(x), ...groupAssets(assets, x.id) })),
  },
};
validateCatalog(manifest);
manifest.signature = sign(canonicalise(manifest));
This is Rule 2. The manifest is the printed menu. Admins can keep editing drafts and players won’t notice until the next publish.
Add a diff endpoint so admins can see what changed before publishing, and a rollback endpoint to restore the previous version if something goes wrong.
Step 7: The game boots
Now we switch to the player’s side. On launch, Unity calls:
GET /v1/public/bootstrap

→ { "minimum_client_version": "1.0.0",
    "maintenance": false,
    "config_version_id": "v7…",
    "media_base_url": "https://dxxxx.cloudfront.net/" }
The game compares config_version_id with the one it saved last time. If it’s the same, nothing changed, so the game uses its saved catalog and skips the next request entirely.
Step 8: Download the catalog
If the version is new, the game asks for the item list:
GET /v1/game/catalog?platform=android
X-Client-Version: 1.2.0
If-None-Match: "v7…"
The API reads the manifest from Redis (falling back to Postgres if needed), keeps only the requested platform’s models, hides items that require a newer app version, and turns S3 paths into full CDN URLs:
{
  "characters": [{
    "key": "ninja", "name": "Ninja",
    "thumbnail_url": "https://cdn…/thumbnail/any/ab12….png",
    "model": { "url": "https://cdn…/model/android/9f2c….bundle",
               "size_bytes": 18234567, "sha256": "9f2c…" }
  }]
}
Notice the response contains links, not files. If the game sends an If-None-Match header with the current version, the API replies 304 Not Modified with an empty body, saving bandwidth.
Step 9: Download the 3D file
When the player taps Ninja, Unity checks its local storage: “Do I already have a file with hash 9f2c…?”
- Yes: load it from disk. No network needed.
- No: download it from the CDN URL and save it under its hash.
The file comes from CloudFront, close to the player, and again bypasses your API completely. For matches, download the opponent’s skins and emotes during the loading screen so nothing pops in late.
Step 10: Show the model
How Unity loads the file depends on the format.
AssetBundle (.bundle)
var req = UnityWebRequestAssetBundle.GetAssetBundle(url, hash);
// after download:
var prefab = bundle.LoadAsset<GameObject>("prefab");
Instantiate(prefab);
glTF (.glb)
var gltf = new GltfImport();
await gltf.Load(url);
await gltf.InstantiateMainSceneAsync(transform);
AssetBundles are Unity-native and support full prefabs with materials and scripts, but they must be built separately for each platform. glTF is a standard format that works across platforms and tools, but supports less Unity-specific setup. Decide this with your Unity developer early. The backend handles either one; only the content type, file extension and platform value change.
What the admin panel looks like
Characters list      → table: thumbnail, name, rarity, status, price  [+ New]
Character detail
  Info tab           → edit name, price, description
  Files tab          → Android model  [Upload]  ready
                       iOS model      [Upload]  pending
                       Thumbnail      [Upload]  ready
  Stats tab          → health, speed, etc.
  [Activate] [Retire] [Delete (draft only)]
Cosmetics list       → same, filtered by type (skin / emote / ...)
Publish page         → diff vs live → [Publish] → [Rollback]
Each Upload button runs three calls in sequence: get upload URL, PUT to S3, confirm.
Common mistakes to avoid
- Uploading files through your API. It works in testing with small files, then falls over in production.
- Overwriting files at the same path. Players get stale cached versions for hours or days. Put the hash in the filename.
- Letting the game read draft tables. One admin typo becomes a live bug for every player.
- Hard-deleting live items. Players lose things they paid for. Retire instead.
- Trusting the browser’s “upload done.” Always verify with a HEAD request.
- Deleting superseded files immediately. Rollback needs them.